FAQs
Q: How to use the mute function?
A: The mute function can only be used when the wired and receiver are connected to the computer
Q: Why can't the controller be turned on?
A: Please charge and activate the handle before using it for the first time. Only after charging can it be turned on and used
Introduction - NYXI Master P1
USE STEPS
Connect to PC
|
Connection method
|
Mode
|
Indicator light
|
Toggle switch
|
Operation
|
|
Receiver connection
|
Xinput
|
Blue
|
Receiver
|
After turning the switch to the receiver gear, the power defaults to this mode
|
|
Dinput
|
Green
|
Receiver
|
After the receiver is successfully connected, press the A + B + HOME key combination at the same time to switch to Dinput mode
|
|
|
Wired connection
|
Xinput
|
Blue
|
Arbitrary
|
Automatically recognized after wired connection, default to this mode
|
|
Dinput
|
Green
|
Arbitrary
|
After the wired connection, press the A + B + HOME key combination at the same time, and the handle vibrates once to switch to Dinput mode.
|
|
|
Bluetooth connection
|
/
|
Orange
|
Bluetooth
|
After turning the switch to Bluetooth, long press the Home button, and the home light will flash in red, green, and blue. At this time, find the Bluetooth device Xbox Wireless Controller and click to connect
|

Connect to Switch
|
Connection method
|
Indicator light
|
Toggle switch
|
Operation
|
|
Wireless connection
|
White
|
NS
|
After turning the switch to the NS gear, open the Switch to search for the device, and click Connect in the Switch.
|
|
Wired connection
|
White
|
NS
|
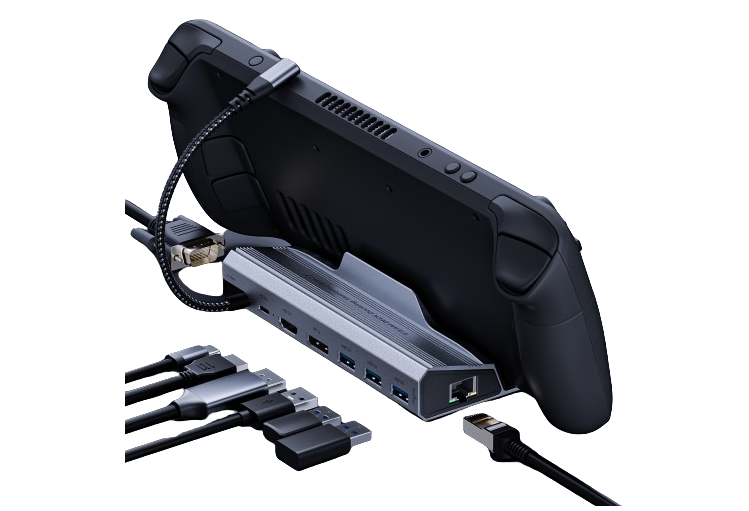
Connect the HUB with USB-A to the Switch, and connect the handle to the HUB through a data cable
|

Connect Android phone, Android tablet, Android TV
Bluetooth connection:
Tap the switch to Bluetooth mode, then search for the device in Phone Settings - Bluetooth, click Xbox Wireless Controller, and you can successfully connect.
Feature Introduction
-
Silent function
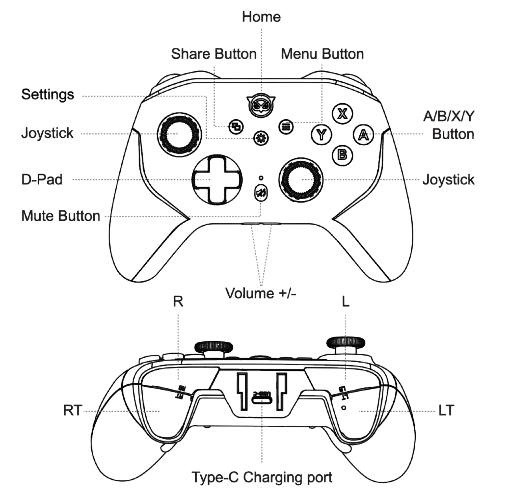
In receiver connection mode or wired connection mode, press the mute button on the handle to quickly mute the PC device.
After the PC device is muted, if you connect a speaker or headphones at this time, the speaker and headphones will also be muted, except for some audio devices that use private protocols.
When the equipment is set to mute, the mute button indicator light turns green. When it is not set to mute, the indicator light will turn off.

-
Volume up and down function
In receiver connection mode or wired connection mode, press the volume up and down keys on the handle to quickly adjust the volume of the PC device.
After adjusting the volume of the PC device, if you connect a speaker or headphones at this time, the speaker and headphones will also be adjusted synchronously, except for some audio devices that use private protocols.

-
RGB lighting effect adjustment function
After turning on the handle, press the setting button on the handle and push the joystick to the left to switch the lighting effect. Follow the cycle of red always on - red breathing - orange always on - orange breathing - yellow always on - yellow breathing - green always on - green breathing - blue always on - blue breathing - indigo always on - indigo breathing - purple always on - purple breathing
After the handle is turned on, press the setting button on the handle and push the joystick to the right to switch the light effect to seven-color gradual change
After turning on the controller, long press the L3 + setting button for 3 seconds to turn on and off the RGB lighting effect
After turning on the handle, press the setting button on the handle and push the joystick up to increase the brightness of the RGB light, and push the joystick down to reduce the brightness of the RGB light.

-
Vibration intensity adjustment
After turning on the handle, press the setting key on the handle and the up direction of the cross key to increase the motor vibration intensity of the handle. Press the setting key and the down direction of the cross key on the handle to reduce the motor vibration intensity of the handle. When the adjustment is successful, the motor will vibrate for a short time for 1 second.

-
Turbo function
ABXY, LB, RB, LT, RT can be set with continuous firing function.
Press the Settings key and corresponding key at the same time. The Home key will flash the aperture once, and the motor will vibrate briefly once to trigger the manual continuous firing of the corresponding key. At this time, hold down the key and do not release it to continue inputting the key function.
When the button is set to continuous transmission, press the setting + corresponding button again to activate the automatic continuous transmission function, and the handle will automatically input the button.
Press and hold the setting key for 5 seconds, or press the setting key and corresponding function keys for the third time to cancel the burst function.
Press the settings + right joystick up operation at the same time to increase the continuous transmission speed; set + right joystick down operation to reduce the continuous transmission speed.

-
Back key mapping and macro programming functions
Support A/B/X/Y, RB, LB, RT, LT, up, down, left, right, L3/R3, back/start buttons
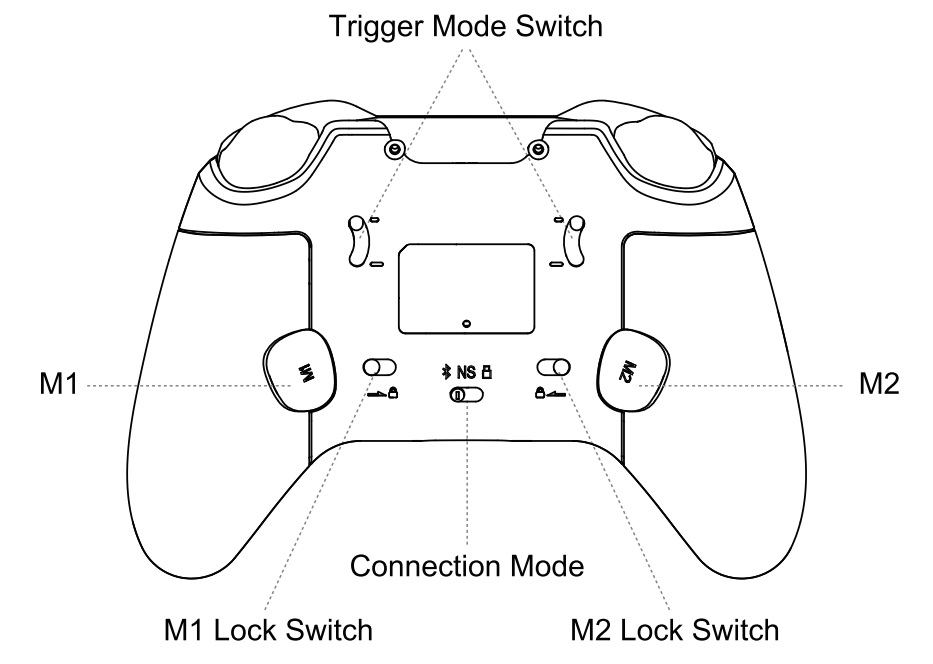
Back key mapping: Long press Set + M1 or Set + M2, the handle vibrates briefly once, and the Home light flashes red and green alternately. At this time, press the key to be mapped, and then press the back key to complete the mapping.
Macro programming: Long press Settings + M1 or Settings + M2, the handle vibrates briefly once, and the Home light flashes red and green alternately. At this time, press the button that needs to be programmed, and press the back button after the input is completed to complete the macro programming. A maximum of 21 buttons can be recorded at a time.

-
Trigger lock function
The product trigger has two types of touch and adjustable stroke. When the trigger lock is in a short stroke, the trigger is a digital trigger that can be triggered by pressing it. When the trigger lock is pulled to a long stroke, the trigger is a 256-level analog trigger.

-
Back key lock function
When you don't need to use the back keys M1 and M2, you can fix the back keys by adjusting the back key lock to prevent accidental touch in the game.

-
Charging indication
The mute button indicator light on the front of the handle is red when charging, and the indicator light goes out when it is full.

Specification parameters
-
Battery Capacity: 2.22Wh
-
Charging Time: about 2.5h
-
Charging Power: 5V/0.2A Max
-
Battery Life: about 6-8h
-
Charging Interface: type-c
-
ABXY: 300W secondary conductive adhesive
-
Joystick Return Rate: wired 500Hz, receiver, Bluetooth
-
Cross Key: touch switch
-
Trigger: long-stroke Hall switch, short-stroke micro switch
-
Joystick: Hall Effect joystick
-
Shoulder/Back Keys: touch switch
Notes
-
Dustproof and Waterproof
The handle does not support dust and water resistance. Please pay attention to protection during daily use and storage.
-
Charge
Use the official charging cable for charging. You can use the USB interface of the computer or other low-power charging heads to charge, avoiding using a high-power charger to charge the handle.
-
Electromagnetic Interference
When using a receiver or Bluetooth to connect to a PC, the controller is susceptible to electromagnetic interference from the surrounding environment. Try to stay away from these interferences as much as possible.
-
Warranty Policy
Please do not disassemble the gamepad independently. The internal structure of the gamepad is precise, and it may not be reinstalled after disassembly, or the factory feel may not be achieved after reinstallation. Therefore, if you encounter any problems during use, please consult NYXI customer service to avoid disassembling it yourself.
-
OTA Maintenance
We will regularly update the firmware of this product, including but not limited to fixing bugs, adding new features, etc. Please regularly follow the NYXI official website or community to obtain the latest firmware information of this product.
-0.png?w=1800&h=1476)

.png?w=2000&h=2000)


.png?w=428&h=292)
.png?w=428&h=292)



.png?w=1500&h=1500)

